Seguidores

sábado, 21 de diciembre de 2024

Calendario de Adviento de Matxalen 2024/Matxalen´s Advent Calendar

 Hola!

Aquí estoy, nuevamente colaborando con este Calendario que nos ilusiona otra vez con las minis. Gracias Matxalen por invitarme una vez más.

Hoy vamos a hacer unas latas navideñas con dulces y galletas y también otras cosillas que espero que os sean fáciles y os animéis a hacerlas.

Vamos a necesitar principalmente apliques de uñas en motivos navideños. Se pueden conseguir en Temu, Shein, Amazon o en cualquier bazar y son muy baratitos. Creo que a mí cada bolsita me costó menos de 1€. También necesitaremos algún imprimible navideño tipo papel de regalo en mini, cartoncillo, pegamentos de varios tipos y papel de seda (el de hacer cometas) preferiblemente blanco.

Here I am, collaborating with this Calendar that brings us exciment for minis again. Thank you Matxalen for inviting me once more.

Today we are going to make some Christmas tins with sweets and biscuits and other things too, I hope they are easy for you and you are encouraged to make them.

We are going to need mainly Christmas-themed nail decoration. You can get them in Temu, Shein, Amazon or any bazaar and they are very cheap. I think each bag cost me less than 1. We will also need some Christmas printables such as mini wrapping paper, cardboard, various types of glue and tissue paper (the kind used to make kites) preferably white.


El imprimible lo hice yo misma con imagenes de la Web y tengo varios motivos, si os interesa decidmelo y os lo envío por email.

Luego de planear mi idea original se me ocurrió que podía hacer bandejitas con galletas también y me puse a buscar posibles bandejas y platos para tal fin, como ven en la primera foto de los materiales. Usar vuestra imaginación.

Empezamos:

1. Cortamos una tira de cartón de 1 cm de ancho y el largo que os de para el diametro de la latita, dejando un  poco para poder pegar. Como hice dos latas, una pequeña de 3 cm de diametro y otra de 4cm, corté dos tiras de 7 y 9 cm. Luego con el papel navideño y pegamento cubrimos ambos lados de la tira.

I made the printable myself with images from the Web. I have several themes, so if you are interested let me know and I will send them to you by email.

After planning my original idea, it occurred to me that I could make biscuit trays too so I looked for possible trays and plates for that purpose, as you can see in the first photo of the materials. Use your imagination.

Let's start:

1. Cut a strip of cardboard 1 cm wide and the length that gives you the diameter of the tin, leaving a little bit to be able to glue it. Since I made two tins, a small one 3 cm in diameter and another 4 cm, I cut two strips of 7 and 9 cm. Then with the Christmas paper and glue we covered both sides of the strip.

2. Le damos la forma redonda y pegamos, yo me ayudé con dos botes para que quedara mejor. Una vez bien pegados, forré también con cinta pegante trasparente (fixo) para darles brillo y protegerlas mejor.

2. We give them a round shape and glue them. I used two containers to make them better. Once they were well glued, I also covered them with transparent adhesive tape to give them shine and protect them better.


3. Luego pegamos con cola blanca sobre cartoncillo para hacer la base.

3. Then we used white glue on cardboard to make the base.


4. Una vez seco el pegamento, cortamos por el borde y tenemos nuestras latitas listas. Ahora rellenamos el interior con papel seda blanco, ponemos dentro en la base y también a los lados.

4. Once the glue is dry, we cut around the edge and our tins are ready. Now we fill the interior with white tissue paper, putting some on the base and also on the sides.


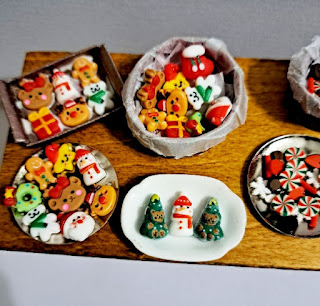
5. Ya están listas para colocar nuestros apliques de uñas, que dan el pego como galletas y dulces navideños. Yo los fui pegando individualmente con un poco de cola blanca.

5. They are ready to place our nail decoration figures, which look like Christmas biscuits and sweets. I glued them individually with a little bit of white glue.


Pero como me pareció poco y tenía más material, como ya os dije, se me ocurrió hacer bandejas varias. Los apliques los pegué con cola en las bandejas de papel y corcho (o madera) y en las metálicas y de porcelana usé superglue.

But as I thought that wasn't enough and I had more material, as I told you, I decided to make some trays. I glued the figures to paper and cork (or wood) trays with white glue and I used superglue to glue them to the metal and porcelain ones.


Y aquí os enseño toda la producción:

And this is all the production:


Mejor que sobren fotos a que falten, jeje. Espero os haya gustado mi contribución. Yo me divertí un rato y lo encontré muy facilillo.

Os deseo Felices Fiestas y un maravilloso nuevo año, que se cumplan muchos de vuestros sueños y metas en el 2025.

Better to have too many photos than not enough, lol. I hope you liked my contribution. I had fun and found it very easy.

I wish you Happy Holidays and a wonderful new year, may many of your dreams and goals come true in 2025.

😘🎄😘🎄😘🎄😘

Alex.


viernes, 13 de diciembre de 2024

La loca de los gatos II/ Crazy Cat Lady II


Hoooola!!

Hace muchísimo tiempo no pasaba por aquí, desde la pasada Navidad y es que este año he tenido aparcado el tema miniaturas. La cuestión es que mi hija, la que vive en Londres, con su pareja, han comprado su primer piso y me apetecía llevarle un regalo hecho por mí en mi visita navideña anual.

Como es una loca de los gatos como su madre, tiene 3 mininos, me pareció que una pequeña escenita de gatines sería ideal.

Me puse manos a la obra buscando una cajita pequeña en un bazar, pues mi hija es bastante minimalista y la preparé con restos de papeles y suelos que tenía en casa.

It's been a long time since I've been here, since last Christmas, as this year I've put the miniatures on hold. The thing is that my daughter, who lives in London, and her partner, have bought their first flat and I wanted to bring her a gift made by me on my annual Christmas visit.

She is crazy about cats like her mother, she has 3 cats, so I thought a little cat scene would be ideal.

I got to work looking for a small box, my daughter is quite the minimalist, and I prepared it with scraps of paper and floors that I had at home.


Una vez listo el interior también la decoré exteriormente con pegatinas.

Once the interior was ready, I also decorated it on the outside with stickers.


Terminada esta parte busqué entre mis cosas, hice algún pedido online y completé imprimiendo algunas imágenes. También aproveché algunos regalos de compañeras como los cojines de gatitos y un gatito que son de Carmen, la alfombra y felpudo de Blanca y los tazones de Carolina.

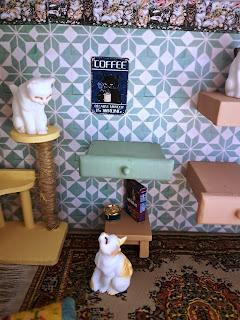
También se me ocurrió poner unas baldas en las paredes, son perfectas para los gatos y tanto mi hija como yo tenemos en casa. Para hacerlas más originales se me ocurrió utilizar cajones sueltos que tenía sobrantes los cuales pinté con pintura a la tiza.

Y este es el resultado:

Once this part was finished, I looked through my things, made some online orders and finished printing some images. I also used some gifts from friends such as the kitten cushions and a kitten that came from Carmen, the rug and doormat from Blanca and the bowls from Carolina.

I wanted to put some shelves on the walls, they are perfect for cats and both my daughter and I have them at home. To make them more original, I used drawers that I had leftover which I painted with chalk paint.

And this is the result:


A mí me parece que quedó muy graciosa y creo que a mi hija le encantó. Aquí la vemos acomodando cosillas.

I think it turned out really cute and I think my daughter loved it. Here we see her arranging things.


Es todo por hoy. Nos vemos la próxima vez con motivo del calendario de Matxalén.

That's all for today. See you next time for Matxalen´s calendar.


Espero que estéis disfrutando de las fiestas, abrazos.

I hope you are enjoying the holidays, big hugs.

Alex 😘😘😘