Hola!
Aquí estoy, nuevamente colaborando con este Calendario que nos ilusiona otra vez con las minis. Gracias Matxalen por invitarme una vez más.
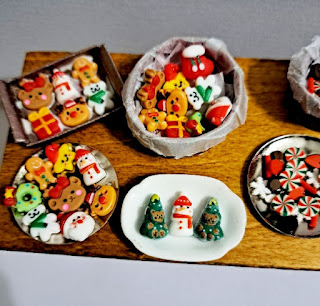
Hoy vamos a hacer unas latas navideñas con dulces y galletas y también otras cosillas que espero que os sean fáciles y os animéis a hacerlas.
Vamos a necesitar principalmente apliques de uñas en motivos navideños. Se pueden conseguir en Temu, Shein, Amazon o en cualquier bazar y son muy baratitos. Creo que a mí cada bolsita me costó menos de 1€. También necesitaremos algún imprimible navideño tipo papel de regalo en mini, cartoncillo, pegamentos de varios tipos y papel de seda (el de hacer cometas) preferiblemente blanco.
Here I am, collaborating with this Calendar that brings us exciment for minis again. Thank you Matxalen for inviting me once more.
Today we are going to make some Christmas tins with sweets and biscuits and other things too, I hope they are easy for you and you are encouraged to make them.
We are going to need mainly Christmas-themed nail decoration. You can get them in Temu, Shein, Amazon or any bazaar and they are very cheap. I think each bag cost me less than 1€. We will also need some Christmas printables such as mini wrapping paper, cardboard, various types of glue and tissue paper (the kind used to make kites) preferably white.
El imprimible lo hice yo misma con imagenes de la Web y tengo varios motivos, si os interesa decidmelo y os lo envío por email.
Luego de planear mi idea original se me ocurrió que podía hacer bandejitas con galletas también y me puse a buscar posibles bandejas y platos para tal fin, como ven en la primera foto de los materiales. Usar vuestra imaginación.
Empezamos:
1. Cortamos una tira de cartón de 1 cm de ancho y el largo que os de para el diametro de la latita, dejando un poco para poder pegar. Como hice dos latas, una pequeña de 3 cm de diametro y otra de 4cm, corté dos tiras de 7 y 9 cm. Luego con el papel navideño y pegamento cubrimos ambos lados de la tira.
I made the printable myself with images from the Web. I have several themes, so if you are interested let me know and I will send them to you by email.
After planning my original idea, it occurred to me that I could make biscuit trays too so I looked for possible trays and plates for that purpose, as you can see in the first photo of the materials. Use your imagination.
Let's start:
1. Cut a strip of cardboard 1 cm wide and the length that gives you the diameter of the tin, leaving a little bit to be able to glue it. Since I made two tins, a small one 3 cm in diameter and another 4 cm, I cut two strips of 7 and 9 cm. Then with the Christmas paper and glue we covered both sides of the strip.
2. Le damos la forma redonda y pegamos, yo me ayudé con dos botes para que quedara mejor. Una vez bien pegados, forré también con cinta pegante trasparente (fixo) para darles brillo y protegerlas mejor.
2. We give them a round shape and glue them. I used two containers to make them better. Once they were well glued, I also covered them with transparent adhesive tape to give them shine and protect them better.


